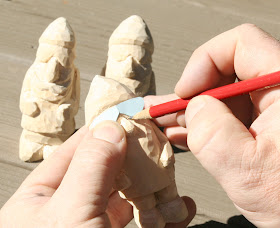
I may have already carved too much of the arms. I rounded the shoulders, but that should be saved until they've been glued to the body so I can blend them realistically to the body. So I decided to STOP and move on to checking the fit of the head to the body.
I'm keeping the arms nearby so once the head gets close to fitting the way I want, I can check all the parts in place. This is a fairly tedious process, with a lot of undercutting here and there and checking the fit over and over.
Once the head and arms fit and look about ready to glue, I can take care of some other areas first. So the head and arms take a nap while I focus on getting the boots carved and work on getting some long vertical folds in the coat. Both tasks will be more easily done before gluing on the other parts. Time to view some more reference photos.
Sunday, October 31, 2010
Saturday, October 30, 2010
Fabric Folds
The whole idea behind carving parts separate is so the tough-to-get-to spots can be carved and painted. This is exceptionally helpful when working on arms, where it can get very tight under and toward the armpit. trying to carve this are out of one piece will often be a source of frustration and unhappiness for the less-than-expert carver - me. So, I am working on the arms today and, before taking too much material away, I will start on the fabric folds. This is a new area of detail for me. I have only made a few serious attempts at carving folds. I started doing some research as to how folds form and look. With my first attempt, I made three serious, novice mistakes. First - I carved the figure to "finished" dimensions which didn't leave enough enough material to work with when I didn't like some of the folds. Second - I carved way too many folds. It's best to keep details like this simplified for the best overall effect. Less is more. Third - Worst of all, I didn't use reference photos and later realized many of the folds were running in the wrong direction.
After that failed attempt, I decided to do a little fold and wrinkle study. I started studying the clothes on people to see where folds formed and the direction they went. I observed different fabrics present folds very differently. Jean folds look very different than sweatshirt folds. Heavy sweaters look very different than light weight ones. For obvious reasons, folds appear in very different places for men and women, but the folds near certain areas are the same. Lastly, loose fitting clothes show folds differently than tighter fitting ones. The point is, you want to reference the actual fabric with the one you're trying to represent. I found unlimited photo references on the internet. Search Google Images with words like: shirt, jacket, robe ... whatever, and get a lot of good material. Online clothing stores have some of the best ones. I also found, for the purposes of carving, drawings of folds to be the best reference. They're simplified, like we want to do when carving folds. Many artists have blogs with good fabric folds posts. Some even explain why and where folds form. Lastly, when I couldn't find a reference to match the position of the body part or article of clothing I needed, I handed my daughter the camera and directed her to snap me in various poses. I did some photo editing and put together a personal
catalog of reference photos that will last me for some time.
Carving the first pass on the arm, I'm using my Denny 3/4" detail knife. Then I'll clean it up and smooth the folds with a small gouge and Denny 5/16" V-tool. It has a nice rounded bottom which is appealing on folds. Maybe I'll do a more detailed tutorial on carving folds someday, when I've master it!
Friday, October 29, 2010
Positioning Arms
Looking at the blank for the body, I can see the angle will leave the arms too close to the body. I want something a little more realistic, so I headed to my belt sander ( mounted on it's side in a vise) and set out to increase the angle of the flat spot on the body. Once I got the left side the way I wanted, I knew I would want this angle the same on both sides, so I used my trusty carpenter bevel to check the angle.
I decided, for the scale of this figure, a flat surface about the size of a quarter would be plenty of glue surface to hold the arm in place, with the added assistance of a 1/4 dowel. I will have to be sure not to touch this area on both arms and body while I shape them later.
A small drafting square and some practical shop geometry helps me locate the center of each circle. After the fact, I realize I could layout the circles with a compass and I'd already have my centers, but the coin method was better for me in positioning the arms to the body.
Next I drill holes and cut dowels to length. Doing this at this stage of work allows me to accurately position the arms as I work, checking their appearance and position. When it comes time to glue them, I'll know exactly where they should be. Once the underside is carved to completion, I'll glue the arms of and carve the shoulders and glue line.
Thursday, October 28, 2010
Laying Out the Body
I took a few days off from Santa to carve a few quick ornaments. I also made some adjustments to the head. I wasn't at all happy with the eyes, so I carved them off and will start again. As long as you don't carve the original sockets too deep, you can usually make minor corrections. Anyway, on to the body. I went through some reference materials I have collected and chose a Santa with a long coat, open to see layers below. I found a nice picture with Santa wearing a vest with some interesting pattern - a painting challenge! My Santa body has already been roughed out and is about 8 1/2" tall. The photo is somewhat smaller, so I went into Photoshop and scaled it up to the right size. Next I put in some horizontal reference lines at key locations on the figure. I printed a hard copy so I could use my trusty dividers to transfer measurements onto the blank. Once I'm satisfied with those layout lines, I can head off to the roughout jig to get rid of some excess material quickly and safely. This saves a lot of the hand fatigue which I would expect if I did all this work with a bench knife.
Tuesday, October 26, 2010
Third Hand Modifications
After working on a few different project over the weekend and trying the jig with large and small blanks, I decided to make a few additions. I kept having to move the loose piece of foam pad around too much and it never seemed to stay in place. So I cut a bunch more and glued them to the jig. I also found that clamping to jig to the bench was not good for me. I came very close to nicking my large gouge. Since I prefer working at my bench, which is outfitted with a vice, I screwed a block to the bottom of the jig so I can just camp it that way. I made the block wide enough so I could fit my hand up through the vise to feed the hold-down straps. Last I added a stop block on one end to help keep the work from sliding. I only screwed this - no glue - just in case I decide to remove them for any reason. This allows me to use even less force on the hold-down straps. I don't need clamps now, so the jig is safer and more efficient than ever. Best of all, the modifications cost me $0.
Santa's Head
Well, I'm already in trouble! I've started on the head and if you look close, you'll see the eyes are a little off and. from the back, one ear is lower than the other. I thought I was being careful, but not enough I guess. I took some off the top of one ear, which helped a little. I might have to re-work the eyes though.
Monday, October 25, 2010
A Third Hand
Cutting a carving blank on a band saw still leaves a lot of material to be removed. It becomes unsafe to try to hack off all the corners with a band saw, so I turn to my large sculpting gouges. These guys are big and they take off extra material fast. But I need a vice or clamps to hold the work in place. Often they slip off and they can damage the wood. Plus I have to worry about hitting a clamp with my gouge and chipping the edge.
This contraption is a solution to not having a third hand! It is a little jig made from some scrap plywood, a couple of bicycle inner tubes and some padding. This device can also be a good helper device for roughing out blanks for carvers who don't own a band saw. I cut a couple slots in the plywood and found some foam rubber laying around the shop. For hold down "clamps" I chose some old bike inner tubes - free from a local bike repair shop. You could also use an old belt or strap or even a length of rope. Clamp down the jig to saw horses or a bench or table top. Feed the straps up through the slots.
Lay the carving blank under the strap loops and place some pads under the wood. Now all you have to do is put your foot through the loops and apply pressure to hold down. You can easily apply as much pressure as you need to offset the force of carving. When you need to rotate the blank, just let up on the foot pressure and adjust. Very fast and simple. It can be made to work standing or sitting down. Best of all, no dents in the wood and no worry about hitting a metal clamp with one of your tools. If you cut the rubber tube - so what? I find this jig to be very flexible and the technique removes wood fast! You have both hands on the tool and with most woods, you don't need to use a mallet.
Sunday, October 24, 2010
Big Santa Project
Two things I am focused on right now: carving Santas and trying a new carving skill or approach for each one. I'm suspending the idea of trying to develop my own style for the time being. not there yet. So I'm starting as new Santa with several new aspects. First, it will be the largest project I have personally done. He'll be close to 11" tall and pretty stout. His body blank used up the better part of a 3 X 3 of basswood. Second, I've been following along with some Lynn Doughty videos again to try to learn a little more about his face carving techniques. Let me just say here, I am strongly opposed to idea of literally copying another person's carving, but in this case, I'm carving a Santa, not a cowboy. Besides, I don't have the technique to copy anything exactly. Lynn was carving the Gabby Hayes figure and mentioned at one stage the his face looked a little like Santa. From that, my idea to use that as a staring point for this figure. I also downloaded some early patterns from his site. This brings me to the third new thing - building a carving from parts. I took his pattern download and made a few changes to suit my own project. I increased the scale of the pattern. I made the front of his body a little more Santa-like. And I used the arm pattern to make another arm that would have a bend, so he can be holding a stick or cane. For the head, I extended the chin so he can have a long beard. I also added to the pattern, a profile of the bottom of the foot. I can copy this to the bottom of the carving and get both feet the same. Lastly, I am revisiting an old technique fro roughing out the body from my sculpture carving days. More on that in a future post. So follow along, if you like, and see what kind of trouble I get into.
Friday, October 22, 2010
The Mystery of the Eye Knife
For some reason, the unusual design of the Denny "Eye Knife" seems to baffle many carvers. In fact, I came to own one because a fellow carver could not get comfortable with it, so he gave it to me to figure out. I admit I haven't really tried it on eyes, so I too was unsure how this came to be called an eye knife. Even knives with names like "detail knife" don't specify what kind of detail. They're just small, pointed knives to be used wherever detail work is done. I found the eye knife useful on a tricky project where I needed a little extra blade tang to reach in and do some careful work. But it was not an eye. It was the inner cage of my cage in a cage carving.
Recently, I was doing a few Santa faces and I decided to see how the eye knife would best be used to carve eyes. I looked at the blade for a minute and wondered why the unusual dip on the back. Then I looked at the extremely angles skew blade.
Now I know a skew blade is not only well-suited for getting into tight corners, like the corner of an eye, but it excels at the slicing cut. If you want a smooth eye ball, a low angle, slicing cut is the best way to go. For this type of cut, I want to move the blade a small distance, with the greatest control possible. To me, that means bracing to tool against my opposing thumb and pivoting. I placed my left thumb (I'm carving righty) on the dip on the back of the blade and my right thumb on that and was able to carefully and accurately pivot the knife and slice across the eye. The right hand does all the moving. This knife comes razor sharp and leaves a beautiful, smooth cut across the eye.
A little practice with this and I found the knife to be perfect for the job it is named for.. I wouldn't suggest you need to go out and get this for eyes. Lots of knifes can be taught to do the job, but if you have the eye knife, languishing in your bag, why not take it out and give it another try.
Wednesday, October 20, 2010
I'm Cleaning Up My Act...
To me, the line that divides the novice carver from the master carver is how clean he works. I'm referring to the carving itself. I have discovered that being focused on "finishing" each section of a carving before moving on makes for a much more efficient and much less frustrating carving session. A couple months ago I picked up a book that changed my way of carving. It's Tom Wolfe's "Carving Santas For Today". I have a fairly limited Library of carving books, but this one seems unique to me. Tom uses almost the entire book to show you haw to carve one santa! Yes, there are a dozen or so pages at the end showing photos of some other carving, but that's not what you pay for when you get this book.
First, he does not work from a roughed out figure, but a simple square block. Second, he works very clean. He starts out with the ball on santa's cap and then to the cap. He pretty much finishes the cap and doesn't have to come back to it. This was for me a revelation and made me conscious of keeping each section I carved as free of "fuzzies" as possible as I progress through the carving.
It's not just about carving the one santa. I was able to take Tom's lesson and apply it to other carvings. That's a good lesson.
[photo is of the first santa I carved using Tom's lesson]
Tuesday, October 19, 2010
Santa Fever
What's with all the Santa carving? They are everywhere these days. If you frequent the Woodcarving Illustrated message boards, you'll witness new Santa carvings popping up every day. Google "santa carvings" and you'll find dozens of sites loaded with a wide variety of Santa figures, caricatures and ornaments. I have Santa fever too. I've been carving them the last few months now. It's pretty all I've been carving. I bought several Santa carving books and some holiday issues of WCI from a few years back. Here's my theory why Santa is such a popular subjec. Whether or not we've been good or bad, we like to think Santa is forgiving. To a wood carver - he is! You can carve him short, tall, fall, slimmed down, as an Old World figure, as a woodsman, a golfer, a beach bum, a ski bum, a cowboy or some hybrid character - like the half-elf-half-santa guy. His form lends itself to all styles, be it low relief, flat-plane carving or caricature. And he's so vague as a character that our eyes see dear old St. Nick no matter how loosely he is represented. His nose can be almost any size. He can have big round eyes or little slits or eyes completely hidden up a cap. The cap itself can be a simple cone, a floppy cap with a pom pom or a study in carving folds. Like I said, he's VERY forgiving. I would say as a carving subject, he's about as popular as the proverbial Mountain Man. Both Santa and mountain man always seem to look good, even when we don't get the nose right or mess up the eyes. But the more I carve him, the better I get. So I keep on carving him. You'll notice my Santas all look different. I haven't decided what my Santas style is. I try to explore some new technique on each new one I do. You don't have to do that, of course. But keep on cranking out those Santas. Experiment. Try and give his face a little character, some expression - some attitude! Most important have fun with him. Santa is a fun guy!
Monday, October 18, 2010
Carvers Are Givers
One thing I have noticed, poking around the internet and taking part in conversation on wood carving message board, as well as talking to real carvers whenever possible - cavers are very generous people! Most of us carve for fun. Even carvers who have their work for sale, really do it because they love it. Just do the math to see what even the best carvers get per hour for their work - it's a labor of love. Many of us give our work away as gifts. The reward is knowing something we made by hand is out there as a kind of humble legacy. The way I have found carvers to be most generous is by sharing what they have learned. We love to talk about knives and wood and get others interested in our art/craft. Read a few messages on the wood carving forum and you'll seldom see a negative comment. Everyone is very encouraging and positive. It is in that spirit that I offer my own learning experience on this blog. One way I can share is by pointing you guys to others who are as willing as I to share what they know. For me, the Out West Carving blog has been great because not only is the workmanship and valuable tips Lynn offers top notch, but his videos are well produced. You can actually see what he's doing. I will be adding more links to videos and blogs as time goes on. Today I want to point you to 3Crosses Woodcarving. Recently I studied Gary's 3-part video tutorial on eye carving and found it to be very helpful. So check out his site. If you know of a helpful site or have a blog, web site or tutorial of your own, let me know. I'll be glad to add them to my links.
Sunday, October 17, 2010
Choose Your Weapon
We all know there are specialty tools for specialty jobs. I hope to explore many of these in detail in future posts. We also know every carver has his few favorites. There are plenty of carvers who manage quite well with just a pocketknife. Watch Lynn Doughty work and be amazed at what can be done with just a utility knife and occasionally one or two gouges. But this is a blog about learning and improving. To my way of thinking, that implies, to some extent at least, try different carving with familiar tools or carving something familiar with different tool. I set up a little test project for myself to see how far I could go with a simple Santa face using a different tool or set of tools. The completed version shown was the first one I completed. The tools were utility knife, for most of the work. A 5 mm Dockyard gouge for some facial shaping. And a 1.5 mm Dockyard V-tool for eye cleanup and hair and beard.
The next three faces were roughed out as far as I could go with only one tool each. On the left, a 1 1/2" straight knife. In the center, a Denny 5/16" V-tool and on the right, a #3 - 3/4" gouge.
The first thing I noticed was that I gravitated to working on the sections of carving that were easiest to shape with that tool. I could easily complete the project with the first knife. So that was no real revelation, but it served as a control. With the V-tool - a rather large one for this size carving, I worked the noose, mustache outline and eye areas under the brow quite easily. I could also go pretty far along shaping the beard. The V was also good along the sides of the nose and under the cap. But that's about it. I then started turning the tool on it's side, more as a straight chisel to get some spots the V-tool couldn't otherwise do. The big flat gouge made me actually change the design a little. I couldn't easily make the eyes like the original, but it gave me a large, more slanted eye easily, by flipping it on it's back and shaping the ball of the eye and cutting out the lids by plunging straight in. The shape of the mustache was also dictated by the size and shape of the gouge. For cutting in some outline cuts, I chocked up on the tool and use just one coner for a slicing cut.
So why bother to do this little experiment? I found some new ways to use the tools. I experienced some ways that the size and shape of a tool can help dictate design. Most importantly, I a little more about the strengths and weakness of my tools and my ability to use them. I recommend trying something like this when you have time. You might discover a new use for an old tool.
Friday, October 15, 2010
Watch a Master At Work
Have you ever wished you could sit next to a master carver and watch him work while he explains, in detail, everything he's doing and why? How would you like to see how he applies paint to the finished work, revealing all his secrets? You can. If you haven't already heard and seen Lynn O. Doughty's videos from his blog, Out West Carving, you own it to yourself to check him out. Lynn carves beautiful, clever, funny western caricatures. Maybe it's not your thing. I don't carve cowboys. But Lynn offers so much more. His videos have opened my eyes to ways to improve my work and do it more efficiently. I wanted to mention his blog because it's only a matter of time before I mention something I've learned from one of his videos. If you're visiting his blog for the first time, I recommend going back to the earliest posts and work your way to the most recent ones.
So grab a cup of coffee and watch and learn!
Thursday, October 14, 2010
Basswood Chew Toy
Things don't always go as planned. I was preparing a small production run of identical Santa figures. Well, very small, only three figures, but apparently my dog thought they were chew toys. Somehow she got up on my work table and grabbed one of the rough outs and chewed it's feet off.
I was sure I left them out of her reach the next day, but she went and did it again! This time she chewed off the feet and the cap. First, I though I might as well chuck the chewed carvings and just rough out two more, but at this point in time, I'm about dealing with my carving problems head on. That's how to get better, right? So I decided I would continue with the carvings ... they just won't all look the same. My solution: take them to the band saw and remove the chewed bottoms and replace them with new boots which I will carve separately and dowel and glue on. As for the chewed cap? He'll be a bald guy who lost his hat! I'll post the results later.
Wednesday, October 13, 2010
What's The Story?
I'm a cabinetmaker by trade. One of the most useful tools around my shop is a piece of scrap wood. The tool is called a Story Stick. It's a free, flexible, disposable and highly accurate tool for transferring measurements. I recently used the one in the photo to layout size of drawer fronts to be added to a set of desk drawers.
A simple card stock version can be put to similar use when transferring from a drawing and especially great if you're making multiple carvings of the same figure. (I always hang on to a couple used file folders for this purpose.) Card stock holds up pretty well for making transfer patterns. More on that in a future post.
The great thing about this method is the card stock is flexible, so even after you've roughed out your carving, the story stick (card) will conform to your carving. Or you can use your trusty dividers to transfer measurements from and existing model and make your story card.
With my Ski Bum Santa project, I have several going at once and I didn't want to mess with free-handing the goggles each time. Enter card stock pattern
Tuesday, October 12, 2010
Taking it up a notch
If you want to get be a better carver, like anything thing else, you have to practice. But you won't see much of a return on your efforts if you continue to practice the same thing. At some point, you have to challenge yourself to try something you don't think you can do. I carved a few Ball-in-a-box pieces and I wanted to see if I could do something a little tougher, so I decided to try a Ball-in-a-cage (basswood). This requires first carving a square block into a near-perfect ball, drawing a cage on that and then carving a ball inside the round cage. It's a lot harder because the cage is in the way more than the box is when you carve a ball-in-a-box. Also, you have more complicated cross-grain issues. To my own amazement, I was able to do this. So I tried another one. This time in butternut - a little smaller - and I rounded the outer cage. Up another notch! I wondered if I could make even more challenging? How about a cage in a cage? I was sure this would be way to hard. I put off even trying for months for fear of realizing my limits as a carver. Finally, I took the plunge and, to my absolute amazement, I was able to do it! It was very tricky to work inside the outer cage without damaging it. The day before, a friend gave me a Denny "eye knife". It's a strange tool which I have yet to try on eyes, but the long tang helped me to get inside the out cage and work easily, but very carefully. So, be brave. Try something you don't think you can do. The result just may surprise you and give you greater confidence.
Monday, October 11, 2010
The Great Divid(er)
There are a number of tools that aren't specifically carving tools that have really helped me. Some can be made cheaply or for nothing. Some you might already have, bought for some other purpose. One very useful tool is the drafting divider. If you're a wood turner, you certainly have one or more of these. It's indispensable for transferring and repeating measurements from one thing to another. I like it for transferring proportions form a drawing to the carving blank(photo 1). One problem I still struggle with is getting the eyes right. Especially the locating the painted pupils. Whether you're trying to carve a caricature or an accurate life-like face, uneven or lopsided eyes will ruin an otherwise pleasant carving. One you decide how big the eye will be, use the divider to check that they are both the same. Once carved and ready to paint, use he divider to insure the pupils are both facing the same way and are the same on both eyes. Set the divider so the tips are at the corner of the eye, either right or left side (photo 2). Then use that setting to locate the center of the pupil (photo 3).
They points will indicate pupils at the same place for each eye.
Sunday, October 10, 2010
Start with a straight blade knife
As I said in the first couple posts, this blog is about helping others who are in the same boat as me - pretty good, but wanting to get better. To do that, you'll have to make some decisions and probably spend some money. For sure, you have to make some sort of time commitment. Whether you hope to be the next great caricature carver or just want to dazzle your friends with an 8-foot chain carved out of a 2X4, you need too study and get the right tools. Choosing (and getting) lots of tools is part of the fun of being a carver. I am not a big fan of buying sets of tools. Note: this is one of those do as I say not as I do moments). I have purchased several so-called sets. But learn from my mistake - you won't use them all. If you can, buy what you need, as you need it and your tools collection will grow, have no fear. The best tool to master is the straight blade. It can be a two-blade pen knife, a fixed blade carving knife or a Stanley utility knife. Learn to sharpen it and do a bunch of whittling to learn what the tool can do. Get yourself a good instructional book or find a couple beginner tutorials on YouTube, and start to work.
I learned a lot from this book. It's still available online. I was lucky to find this one used for a couple bucks. Every project here teaches something about the limits of your skill, the wood you choose and the tool you are working with. I encourage you to do multiple versions of each using different tools and different woods.
Saturday, October 9, 2010
A Different Approach
Here's what I plan to do with this blog. I will talk about projects I have going, direct you toward some books, videos, blogs and other learning tools, talk about tools and techniques. How is that "different"? Well, because I will not discuss or recommend anything I haven't tried in hopes of improving myself as a carver. When I find a good tip or trick, I'll try it out and post the results of how and maybe why I help me to solve a carving problem. I hope my posts will show a fresh approach and help motivate you to improve. Improving as a carver is equal to enjoying it more!
My Story
I've been whittling or carving things out of wood since I was a kid. I am pretty much self-taught, at least until very recently. Most of my learning came from trial and error, with a lot of error! Ruined carvings, cut fingers and sloppy results were the typical result of my efforts. Fast forward to maybe 6 years ago. I am a Scoutmaster for a local Boy Scout troop and every year we go off to summer camp for a week. I started using that time to teach the boys carving and impress them with assorted carved neckerchief slides, wooden chains and ball-in-a-box carvings. When camp was over, I'd return home and put away my tools for another year. Trust me, that's not the way to become a better carver.
Last year, I started carving, as much as possible, every Sunday. I did get better, but only a little. Only in the past year, with study, daily practice and a focus on what I want to be as a carver, have I been able to show real improvement and reach the next plateau. I'm not an expert and I'm certainly not a beginner. That middle ground, the "intermediate carver" is where I fit in. It's a big group of us and there's a wide variety of skill levels within that category. I have found the internet a great source of knowledge. There are some really great blogs and lots of helpful videos. I will point you to the ones that helped me most and share what I am learning as I go. The Sunday Carver is here to help the intermediate carver become a better intermediate carver. Few of us will ever get to call ourselves experts or master carvers, but we should be able to have a great time reaching for that star.