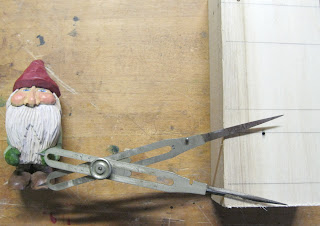
I have several methods I use for transferring measurements and scaling up or down when I make duplicate carvings. If you haven't yet, please see Part 1 of this post to see the figure I will use as an example. My original model is 3 1/2" high and I want to scale him up to 6" high, not concerning myself with the other two dimensions true to scale. The math is 6 divider by 3.5=1.71. Call this the "factor" for future use. Each method has advantages and disadvantages depending on your purpose, number of duplications and availability of the tools needed.
Method 1: For a 1:1 ratio - transfer of key measurements using a shop-made tool. Someone gave me this, but you can find plans for it online. In the photo I have set the pencil point to key locations, say the bottom of the nose, then simple transfer the line to your blank. It's a great tool for marking any horizontal lines all the way around carving blanks.
Method 2: Scaling up or down. Tools needed are: Ruler, dividers or a compass, calculator,
inches to decimal conversion chart , square, pencil.
Using the dividers, set point to a measurement on the original, again, bottom of nose. Lay the dividers against the ruler to find the measurement. Enter this number as a decimal into the calculator and multiply by the factor (1.71). Take that number and reset the divider to that product of that math and transfer it to the larger blank. Use the square to lay the line around the blank. Repeat for any and all key point you want to transfer., (i.e. botttom of cap, top and bottom of hands, top of boots, etc.) Keep in mind, this just transfers key point and then you'll have to freehand the figure. If you need a pattern to make a rough out, you will use a different method.

Method 3: A number of years ago, my father-in-law gave me these proportional dividers. I never appreciated their value until now. They go for a couple hundred bucks used now - yikes! But if you come across them at a yard sale - grab them! You use them by closing the divider, Slide the center piece up or down the groove to get a ration number. There are machined lines at certain numbers, like 2 for example. That would make the long point at a 2:1 ratio compared to the short point. Once set, whatever opening you set one end to, the other stays the same
ratio to that. 2:1, 3:1, whatever you choose. For this you wouldn't need a calculator, ruler ... nothing. And the ratio will always be perfect.
Method 4: If you can work with 1: 1/8, 3/32, 1/4, 3/16
3/8, 1/2, 3/4 proportions, you might use a triangular drafting rule. Use your divider or compass to scale from one to another. It would not really work with the 1.71 relationship, although you could get something close.

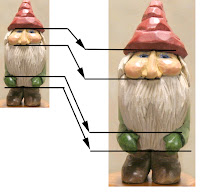
Method 5: This last method requires you to be able to digitally photograph your work and have some kind of photo editing software to work with. I use Photoshop because it uses Layers., but any software that allows scaling and has a way to overlay guides for reference marks will work. This method has the added feature of allowing you to take multiple photos of your original and make a pattern that can be used too transfer right on to your blank for roughing out. You could use the same exact method to scale a pattern that you scan or download from the net. I have done this with digital patterns with great success. If you are photographing your own work, be sure it's taken dead-on level and not from an angle above or below the figure. We need accurate height and width. Import the photo into your edit program. Be sure the rulers or on. Crop the image tight, top to bottom and slide the image to the upper left corner. Duplicate the original image to another layer and, using the rulers, scale it up to the larger size. Hold shift when doing this will keep all measurement in proportion. Drag the blue guide lines to key points (again - under nose, eyes, top of forehead, etc). Use these guides to locate a series of horizontal line for printing (the blue guide lines do not print). Do the same for the original and the scaled version. If you want a front and side view, just use a blue guide line to set the bottom to, so they are the same height. Now you can print this out, use either the image as a pattern to the lines as guide point to transfer onto your blank.
If any of these methods are of interest to you and I didn't explain them clearly, leave a comment and I'll elaborate. And let me know if you know of another method - I'll feature it here.
 This will be my last post for 2010! I finished a few pieces in the past week or so, but they are for gifts to my family members, so I don't want to post them until after the holidays.


