 In Part 1, I said you would need 18 lengths of PVC. You will actually only need 16. So while your table is clamped, go ahead and cut 16 pieces of 3/4" X 3 3/4" PVC. Sand the sharp edges smooth. To insure a tight pressure fit for the tubes, wrap 7-8 turns of 3/8" electricians tape around each PVC tube.
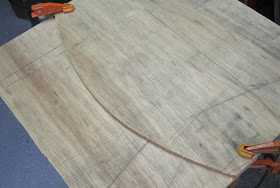
It's time to move on to the back curve. Cut to the layout line. Make a mark on either side, from the back edge about 2 1/2". Clamp the 6" X 18" ledge blank aligning it with the two marks. Flip the board over and draw along the curved edge onto the ledge piece. Cut this carefully, just leaving the line.
Mark a line parallel to the curve with a combination square or compass set to 2". Now set the tool to 1" and mark another line. This will be the center line for the PVC holes. Cut to the 2" line. Using the sanding drum, sand the inside (concave) edge, but leave the outside curve.

Starting from the midpoint of the centerline make a mark to one side at 3/4". Layout your centers for the PVC section at 1 1/2" on center. This should give you enough for 16 tools.
By starting from the center and working toward the, you will be more likely to have an even space on either end. This just looks better!
Drill the holes with a 1 1/8" bit. It's best to do this on a drill press to assure vertical holes. Use a backer board to help minimize tear out. Sand the bottom of this piece. Using just a small amount of glue to avoid filling the holes with squeeze out, clamp the ledge strip to the deck, taking care to align the side and back.
Once the glue has dried, sand the back, curved edges flush. This need to stay vertical, so use a sander with a 90 degree table. I use a sanding disk mounted in my table saw. Cut the back and side strips. Leave each a little long. Measure across the back of the deck and mark the center on the bottom.
 On the back strip, mark the center. The back strip gets glued and screwed, starting from the center and working out t the sides. Carefully drill pilot holes so the 1/2" plywood doesn't split. The end screws will not be enough to hold the last 1" tight to the deck, so add a couple clamps.
 When you apply the side strips, they will help keep he back strip from springing.
When the back is cured, use a hand saw to cut off the excess strip. Sand or file flush to the side. Glue and clamp the side strips on. Once this is cure, add a couple screw to be sure the edge doesn't get popped off. Sand whatever part of the side strips that overhangs the front or back.

Lastly, round and sand all edges and corners that might poke into you while using the table. Apply a couple of coats of finish to help you avoid splinters when you wipe across the top to move chips.
To protect sharp tools, I used a scrap of very dense foam mat for the inserts of the PVC tool holders. To cut the foam for a perfect fit, I made a little cutter from a scrap of PVC using a belt sander and a utility knife to cut the "teeth". Just twist back and forth an apply a little pressure to cut the foam.
This project is a bit of work and does take some carpentry skills. But it's worth the effort. If you don't think you're up for it, but would like one of these, I accept commissions. Let me know. Good luck!


I like your lap table.
ReplyDeleteHas it worked out to your satisfaction?
What sort of a chair works best with it?
Have you realized any improvements after using it for awhile?
Do your tools stay in the holders when do you transport the table?
I still use it all the time. The tools stay put pretty well. I wish I had a few more slots - I tend to use lots of different tools. You need a chair without arms. I mostly use it sitting on a sofa.
ReplyDelete