Friday, December 24, 2010

Wedding Spoon

This will be my last post for 2010! I finished a few pieces in the past week or so, but they are for gifts to my family members, so I don't want to post  them until after the holidays.

Speaking of holidays, I will be spending my New Year's Eve this year at a blessed event. My niece will be getting hitched just before the year ends. She is a special niece, so I wanted to give her something special. Something with some symbolic meaning to remember the day by. So here is a love spoon I made for her. I'm calling it a Wedding Spoon, since the tradition of a love spoon is that it should be given by the groom. Ideally made by the groom, but that would not be happening in this case. I'll be back here posting away sometime in early 2011.

All the best and Happy New Year!

Monday, December 20, 2010

Santa Tutorial

I know a week hasn't gone by yet, but I have a lot of work to do this week and it will be hard for me to do much blogging. But I came across this site and I liked the photo tutorial of a Santa project. Nothing new for most of us, but I always find some new technique or new ways to crave an eye, a beard, a hat in every tutorial I see. I never would do eyes this way, for example, but I will try after seeing this. enjoy!

Saturday, December 18, 2010

A Time to Reflect

This time of year can be joyous, hectic and fattening, but it's also a time when we start to reflect on a year gone by and another one coming toward us. I am not one to make a lot of New Year's  resolutions, but I do like to  set goals both large and small in hopes I can be better next year than I was this year. Since this is a blog devoted to carving, I wanted to reflect on what I have learned and accomplished in the past few months.

Starting back in September, I realized I really wanted to get serious about carving. I did a lot of research. I started learning about how to get me tools really sharp. I bought a few tools I needed to fill out my collection based on the type of carving I wanted to do. I started studying technique with books, magazines and the internet. I made a commitment to myself to carve just about every day, if at all possible. I joined the WCI Forum to become part of a greater community of woodcarvers, which has brought me motivation and encouragements. I started this blog, which has allowed me to share my progress with the outside world. Seeing nearly 2900 views in just over three months has given me the drive to keep it going. And, most important of all, I have decided to "put myself out there". I did this in two ways. First I set up shop on Etsy.com, which forced me to start finishing work to a level of quality that was worthy of sale to others. In just a couple months, I sold more than 25 pieces! This gives me personal gratification, but more importantly, tells me that there is a growing appreciation for hand crafted objects of art. 

I will be finishing up a few last Santas for 2010 in the next week or so and then I'd like to get on to some other types of carving. I have a few idea which I'll share closer to 2011.  Thank you to my "followers" and viewers of this blog and thank you to everyone who has offered a word to encouragement to me or another carver this past year. It really does make a difference.

Wednesday, December 15, 2010

Site of the Week

An important part of my learning process is study and research. The internet is the larger part of that area of study. So I thought it would be appropriate to start including mention of web pages and blog sites that have helped me and are sites that might have gone unseen by my readers. Sometimes I find sites I would have otherwise never come across by searching images. While searching for an image of a dove the other day, I came across a process slide show of a wonderful relief carving of a dove at the Woodworker's Institute web site in their Wood Carving section. Poke around the projects menu and you'll find this one for a Santa Ornament. I hope you find something useful on this site. I certainly have.

Tuesday, December 14, 2010

Santa Ornament Makeover

Carving from rough outs, patterns and designs by other carvers is a great way to improve your carving. I do it - we all do. But at some point, if you want to have some identity as a carver, you will have to invent your own. One way I found involves taking a design or pattern that works and just give it a twist... a makeover! I am fond of this Hanging Santa figure published is Woodcarving Illustrated. I have made several of them and each has had his own personality, but he will never be my own design.

My idea was to keep the hanging idea and incorporate a different figure. I chose to try making it a hanging elf. Though I can carve what I visualize, I can't draw it as well, so I went searching for some inspiration.

I found a downloadable coloring book picture of an elf that I thought might work. Then I went to my daughter, who has wonderful art skills and asked her to help transform the coloring book character into the hanging form. From that, I was able to create a front and side pattern set and using Photoshop, size it the way I wanted.


So here's the result. I'm pretty happy with it. It gave me a chance to try several new techniques in order to apply a solid idea to a two-dimensional line drawing and adapt it to the original form.

Tuesday, December 7, 2010

Making It Big(ger) - part 2

I have several methods I use for transferring measurements and scaling up or down when I make duplicate carvings. If you haven't yet, please see Part 1 of this post to see the figure I will use as an example. My original model is 3 1/2" high and I want to scale him up to 6" high, not concerning myself with the other two dimensions true to scale. The math is 6 divider by 3.5=1.71. Call this the "factor" for future use. Each method has advantages and disadvantages depending on your purpose, number of duplications and availability of the tools needed.

Method 1: For a 1:1 ratio - transfer of key measurements using a shop-made tool. Someone gave me this, but you can find plans for it online. In the photo I have set the pencil point to key locations, say the bottom of the nose, then simple transfer the line to your blank. It's a great tool for marking any horizontal lines all the way around carving blanks.


Method 2: Scaling up or down. Tools needed are: Ruler, dividers or a compass, calculator, inches to decimal conversion chart ,  square, pencil.

Using the dividers, set point to a measurement on the original, again, bottom of nose. Lay the dividers against the ruler to find the measurement. Enter this number as a decimal into the calculator and multiply by the factor (1.71). Take that number and reset the divider to that product of that math and transfer it to the larger blank. Use the square to lay the line around the blank. Repeat for any and all key point you want to transfer., (i.e. botttom of cap, top and bottom of hands, top of boots, etc.) Keep in mind, this just transfers key point and then you'll have to freehand the figure. If you need a pattern to make a rough out, you will use a different method.

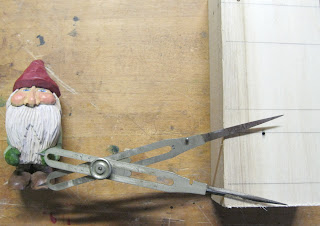
Method 3: A number of years ago, my father-in-law gave me these proportional dividers. I never appreciated their value until now. They go for a couple hundred bucks used now - yikes! But if you come across them at a yard sale - grab them! You use them by closing the divider, Slide the center piece up or down the groove to get a ration number. There are machined lines at certain numbers, like 2 for example. That would make the long point at a 2:1 ratio compared to the short point. Once set, whatever opening you set one end to, the other stays the same ratio to that. 2:1, 3:1, whatever you choose. For this you wouldn't need a calculator, ruler ... nothing. And the ratio will always be perfect.

Method 4: If you can work with 1: 1/8, 3/32, 1/4, 3/16
3/8, 1/2, 3/4 proportions, you might use a triangular drafting rule. Use your divider or compass to scale from one to another. It would not really work with the 1.71 relationship, although you could get something close.


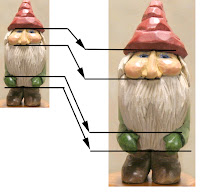
Method 5: This last method requires you to be able to digitally photograph your work and have some kind of photo editing software to work with.  I use Photoshop because it uses Layers., but any software that allows scaling and has a way to overlay guides for reference marks will work. This method has the added feature of allowing you to take multiple photos of your original and make a pattern that can be used too transfer right on to your blank for roughing out. You could use the same exact method to scale a pattern that you scan or download from the net. I have done this with digital patterns with great success. If you are photographing your own work, be sure it's taken dead-on level and not from an angle above or below the figure. We need accurate height and width. Import the photo into your edit program. Be sure the rulers or on. Crop the image tight, top to bottom and slide the image to the upper left corner. Duplicate the original image to another layer and, using the rulers, scale it up to the larger size. Hold shift when doing this will keep all measurement in proportion. Drag the blue guide lines to key points (again - under nose, eyes, top of forehead, etc). Use these guides to locate a series of horizontal line for printing (the blue guide lines do not print). Do the same for the original and the scaled version. If you want a front and side view, just use a blue guide line to set the bottom to, so they are the same height. Now you can print this out, use either the image as a pattern to the lines as guide point to transfer onto your blank.

If any of these methods are of interest to you and I didn't explain them clearly, leave a comment and I'll elaborate. And let me know if you know of another method - I'll feature it here.

Sunday, December 5, 2010

Making It Big(ger) - part 1

I have started selling some of my carving from my Etsy shop. But it hurts a little each time something sells and you know you'll never see it again. It's a little like having one of you kids grow up and move out. (That's not always a bad thing). Recently, I was carving from scraps and without a plan and this little guy popped out. I've grown to like him quite a bit, but I wished I had made him larger. So I set out to see if I could scale him up without loosing too much of his personality. Two things are working against my creating a larger replica. First, I'm not so good a carver that I can duplicate my own work perfectly. Second, the larger versions are still being made from whatever I have lying around in my scrap box, so scaled up in height, but not to scale for  the width/depth of the block. So keep in mind, I will be talking about transferring proportions on the height of the blank only.

This will be a 2-part blog enter since there are several ways to scale proportions. Each has a different set of expense, ease and process. But it all starts with some simple math. Like I said, I am not starting with a scale amount and then cutting a blank to fit - that's a different lesson. Maybe a subject for a future blog post. Here. I'm taking the original (about 3 1/2" high) and transferring proportions to a couple larger blocks I had on hand.

First, I have to convert all my measurements to decimal so I can use my calculator. I have been doing this for years, so it's second nature. Pardon me for this if you haven't memorized decimal conversions.

So 3.5" is the original and my two blanks are 4 1/2" (4.5") and 6" tall. I want to come up with a scale factor. I do this by simply dividing the larger by the smaller. 4.5 divided by 3.5 = 1.28. 6 divided by 3.5 = 1.71.  We're shooting for "close" so I'll round off the numbers I get. I still use conventional measure. If you use metric, it's a little more accurate and the math is easier.

So for the middle size figure, I will multiple every measurement I take from the original by a factor of 1.28. So if the original figure is 1 3/4" (1.75") from bottom to top of nose, then the 4 1/2" figure will be 1.75 X 1.28 = 2.24. That's darn close to 2. 25 or 2 1/4". Close enough. This project is not about getting an exact scale enlargement, as I said, but the principles are exactly the same, if that's what you set out to do.

In part 2 of this post, I will show at least four ways to scale a figure, or a photo of one. One method of transferring measurements does not even require math at all beyond the first calculation.

More to come ...

Friday, December 3, 2010

A Quick Left Turn


"If you don't change direction once in a while, you're likely to end up where you're going".

I heard that the other day, and it seems like a phrase that applies to life, but it certainly applies to carving. Generally speaking, starting a project with a plan in mind seems to be a good idea. But sometimes, where you end up isn't where you want to be, even when things go right. That was the case with this Rolley Polley Santa I set out to make. I had a pattern for him, and things were going fairly well, but as he started to really take shape, I didn't really care for him and set the half-finished carving aside - for almost a month. When I was looking for a new project to start and I realized Mr. Polley had quite a bit of material I could work with, so I decided to try something different with him. I carved him down in size a little, took the belt sander to the rounded bottom, creating a small flat spot, and cut him a set of boots. I left extra material so I could carve a dowel tenon for attaching to the body. This made carving the boots, shaping the lower body and painting much easier, before I had to finally glue boots to body. I'm pretty happy with the outcome. You can see in the pictures what he was looking like before the boots, a finished, unpainted carving and the final painted version.